前言
本地已经玩了 ollama 很长时间了, 今天打算把 ollama 安装到服务器上, 但是服务器没有外网, 所以只能离线安装了, 找了一下离线装教程还是比较少了, 所以自己写一篇, 以便以后查阅.
离线安装 Ollama
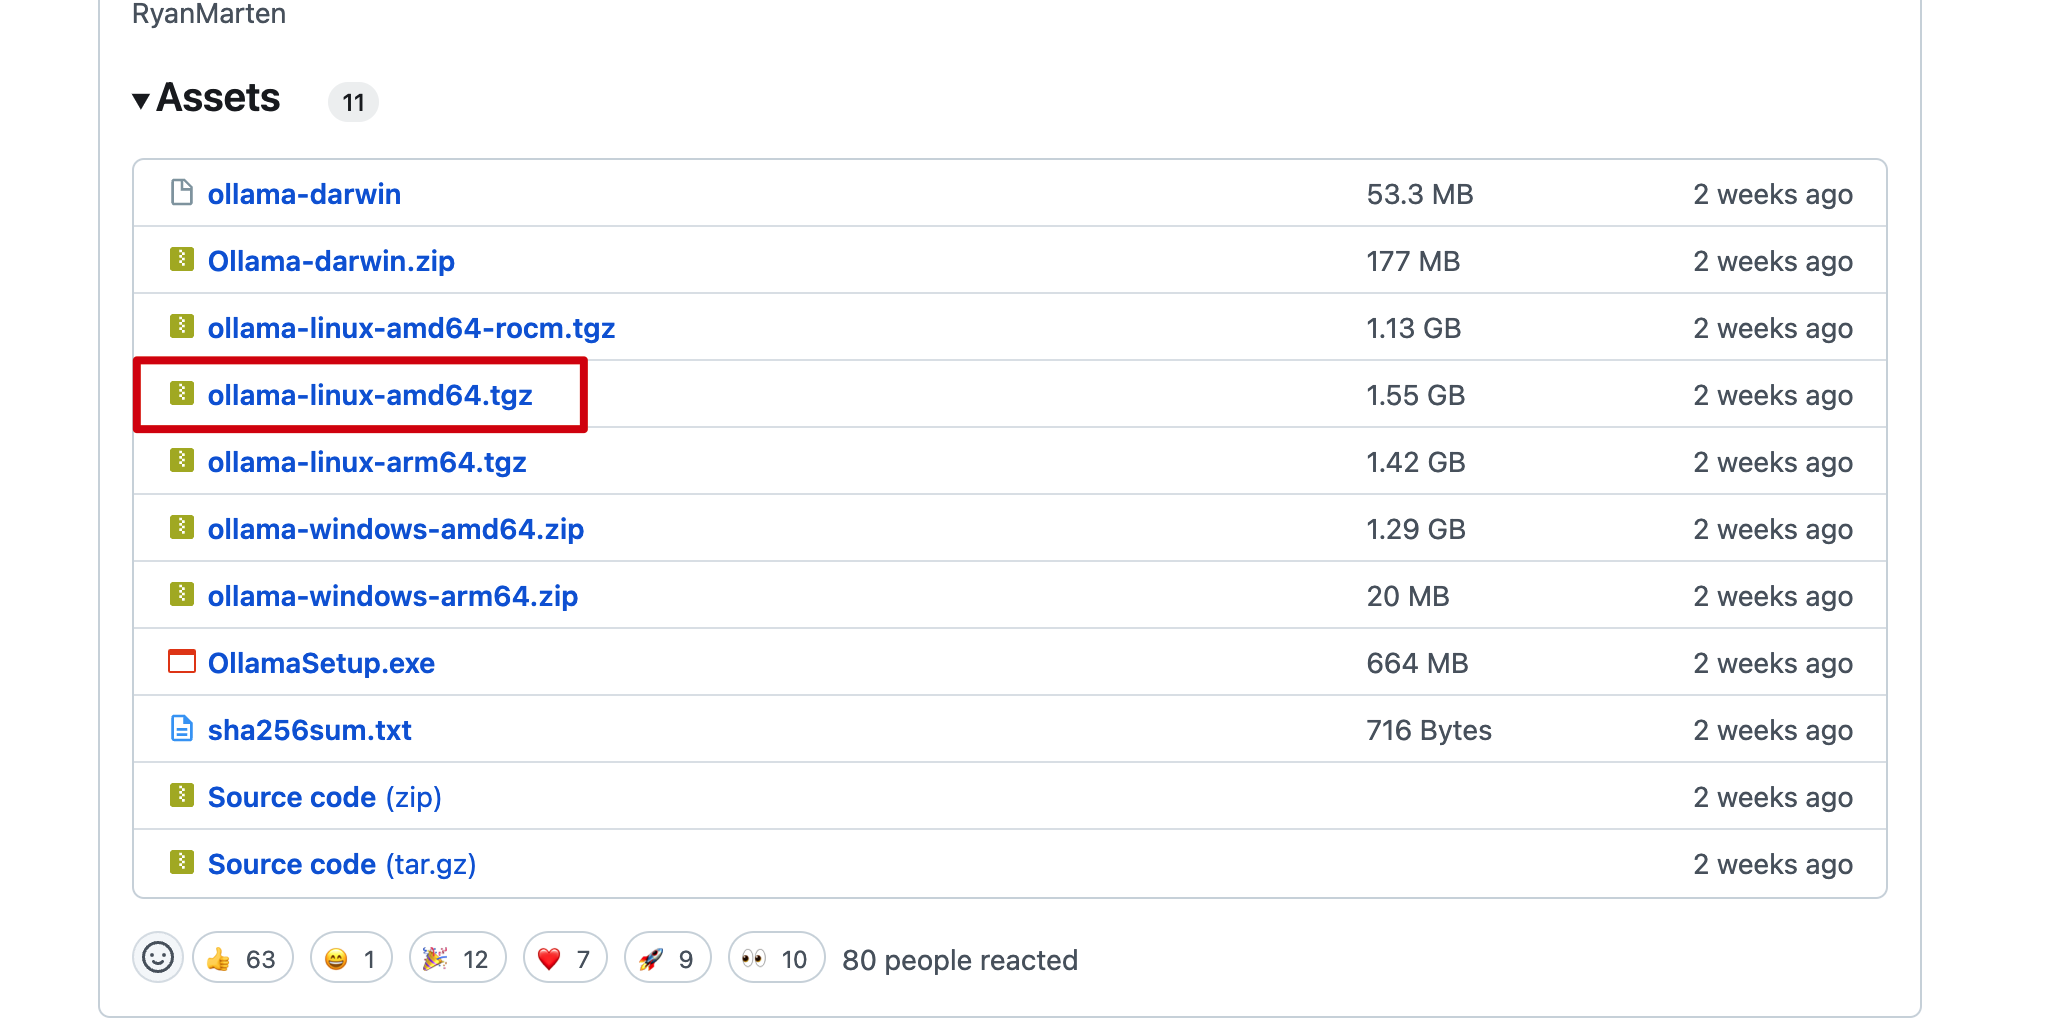
下载安装包
在官方 Release 中进行下载, 根据服务器的 cpu 类型下载对应的安装包, 下载完成后上传到服务器上.
安装
解压安装包 ollama linux amd64.tgz, 进入到解压后的目录, 执行 install.sh 脚本进行安装.
# 解压安装包
tar -zxvf Ollama\ Linux\ AMD64.tgz
# 将 ollama 执行命令移动到 /usr/bin 目录下
sudo mv bin/ollama /usr/bin/ollama
启动并添加开机启动
1.创建执行用户, 这一步可以忽略, 可以直接设置 root 或其他有 ollama 执行权限的用户都可以
sudo useradd -r -s /bin/false -U -m -d /usr/share/ollama ollama
sudo usermod -a -G ollama $(whoami)
2.创建配置文件
创建文件 /etc/systemd/system/ollama.service, 并填充如下内容, 其中的 User 和 Group 根据上一步的选择填写
[Unit]
Description=Ollama Service
After=network-online.target

[Service]
ExecStart=/usr/bin/ollama serve
User=ollama
Group=ollama
Restart=always
RestartSec=3
Environment="PATH=$PATH"

[Install]
WantedBy=default.target
然后执行如下命令
# 加载配置
sudo systemctl daemon-reload
# 设置开机启动
sudo systemctl enable ollama
# 启动 ollama 服务
sudo systemctl start ollama
离线安装模型
如下使用 gguf 模型安装方式, 模型安装的方式都差不多, 可以参考如下方式
Qwen2.5-3b
1.下载模型, 可以到 huggingface 上搜索对应模型的 gguf 版本, 如搜索 qwen2.5-3b-gguf
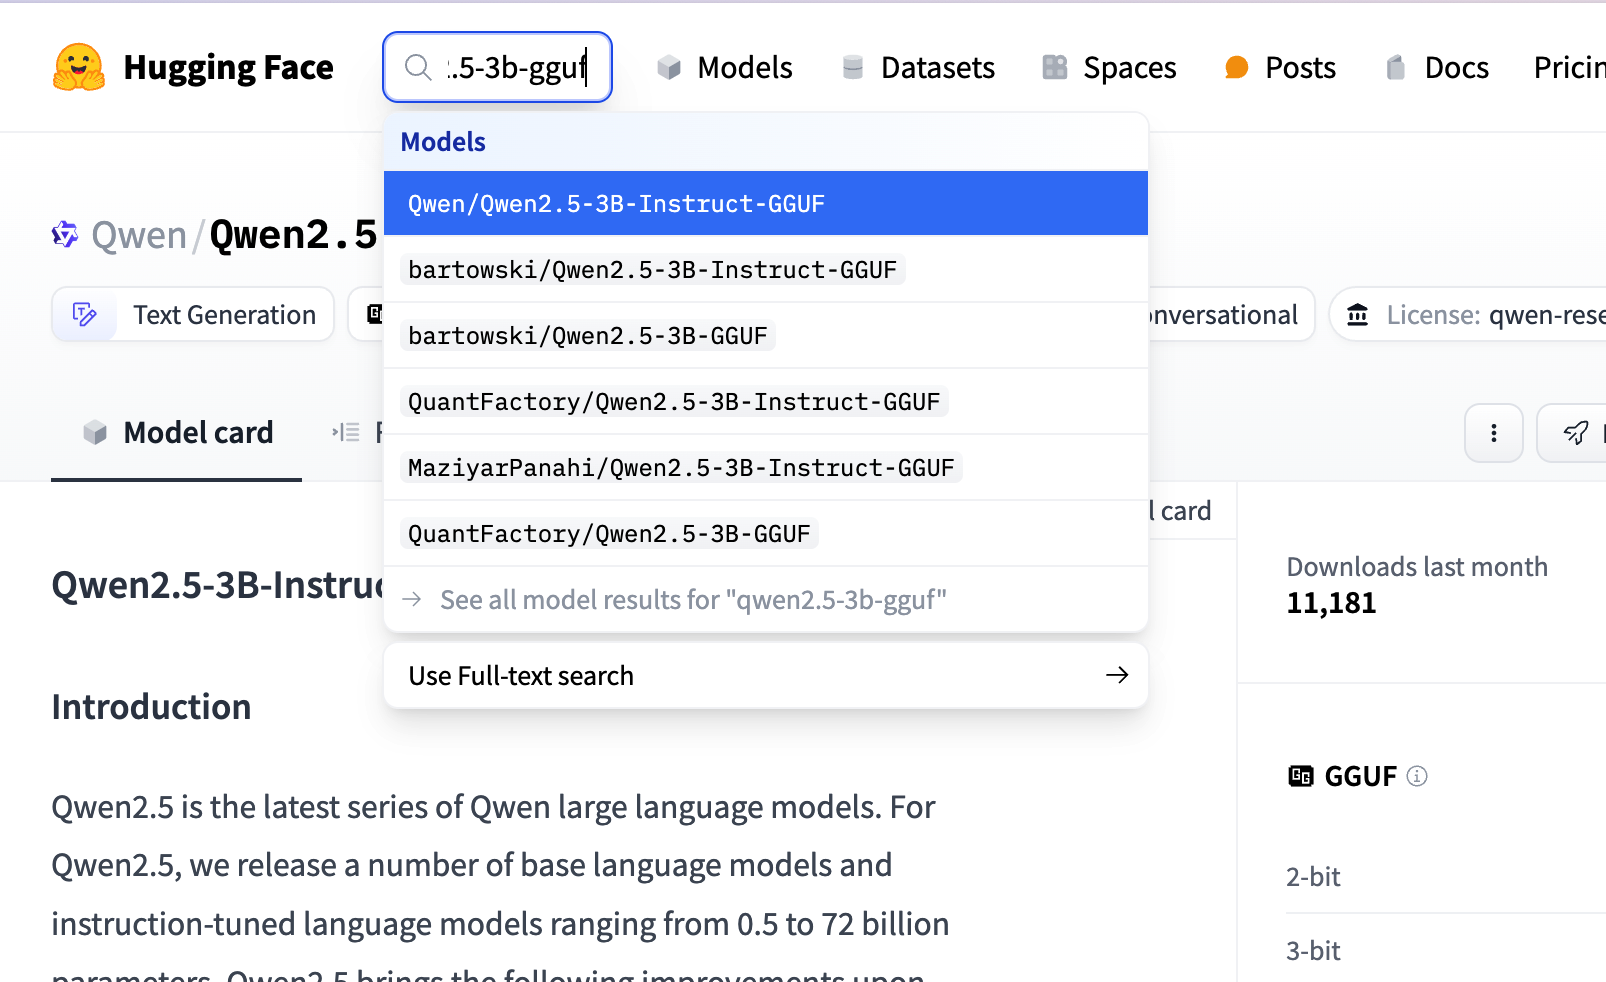
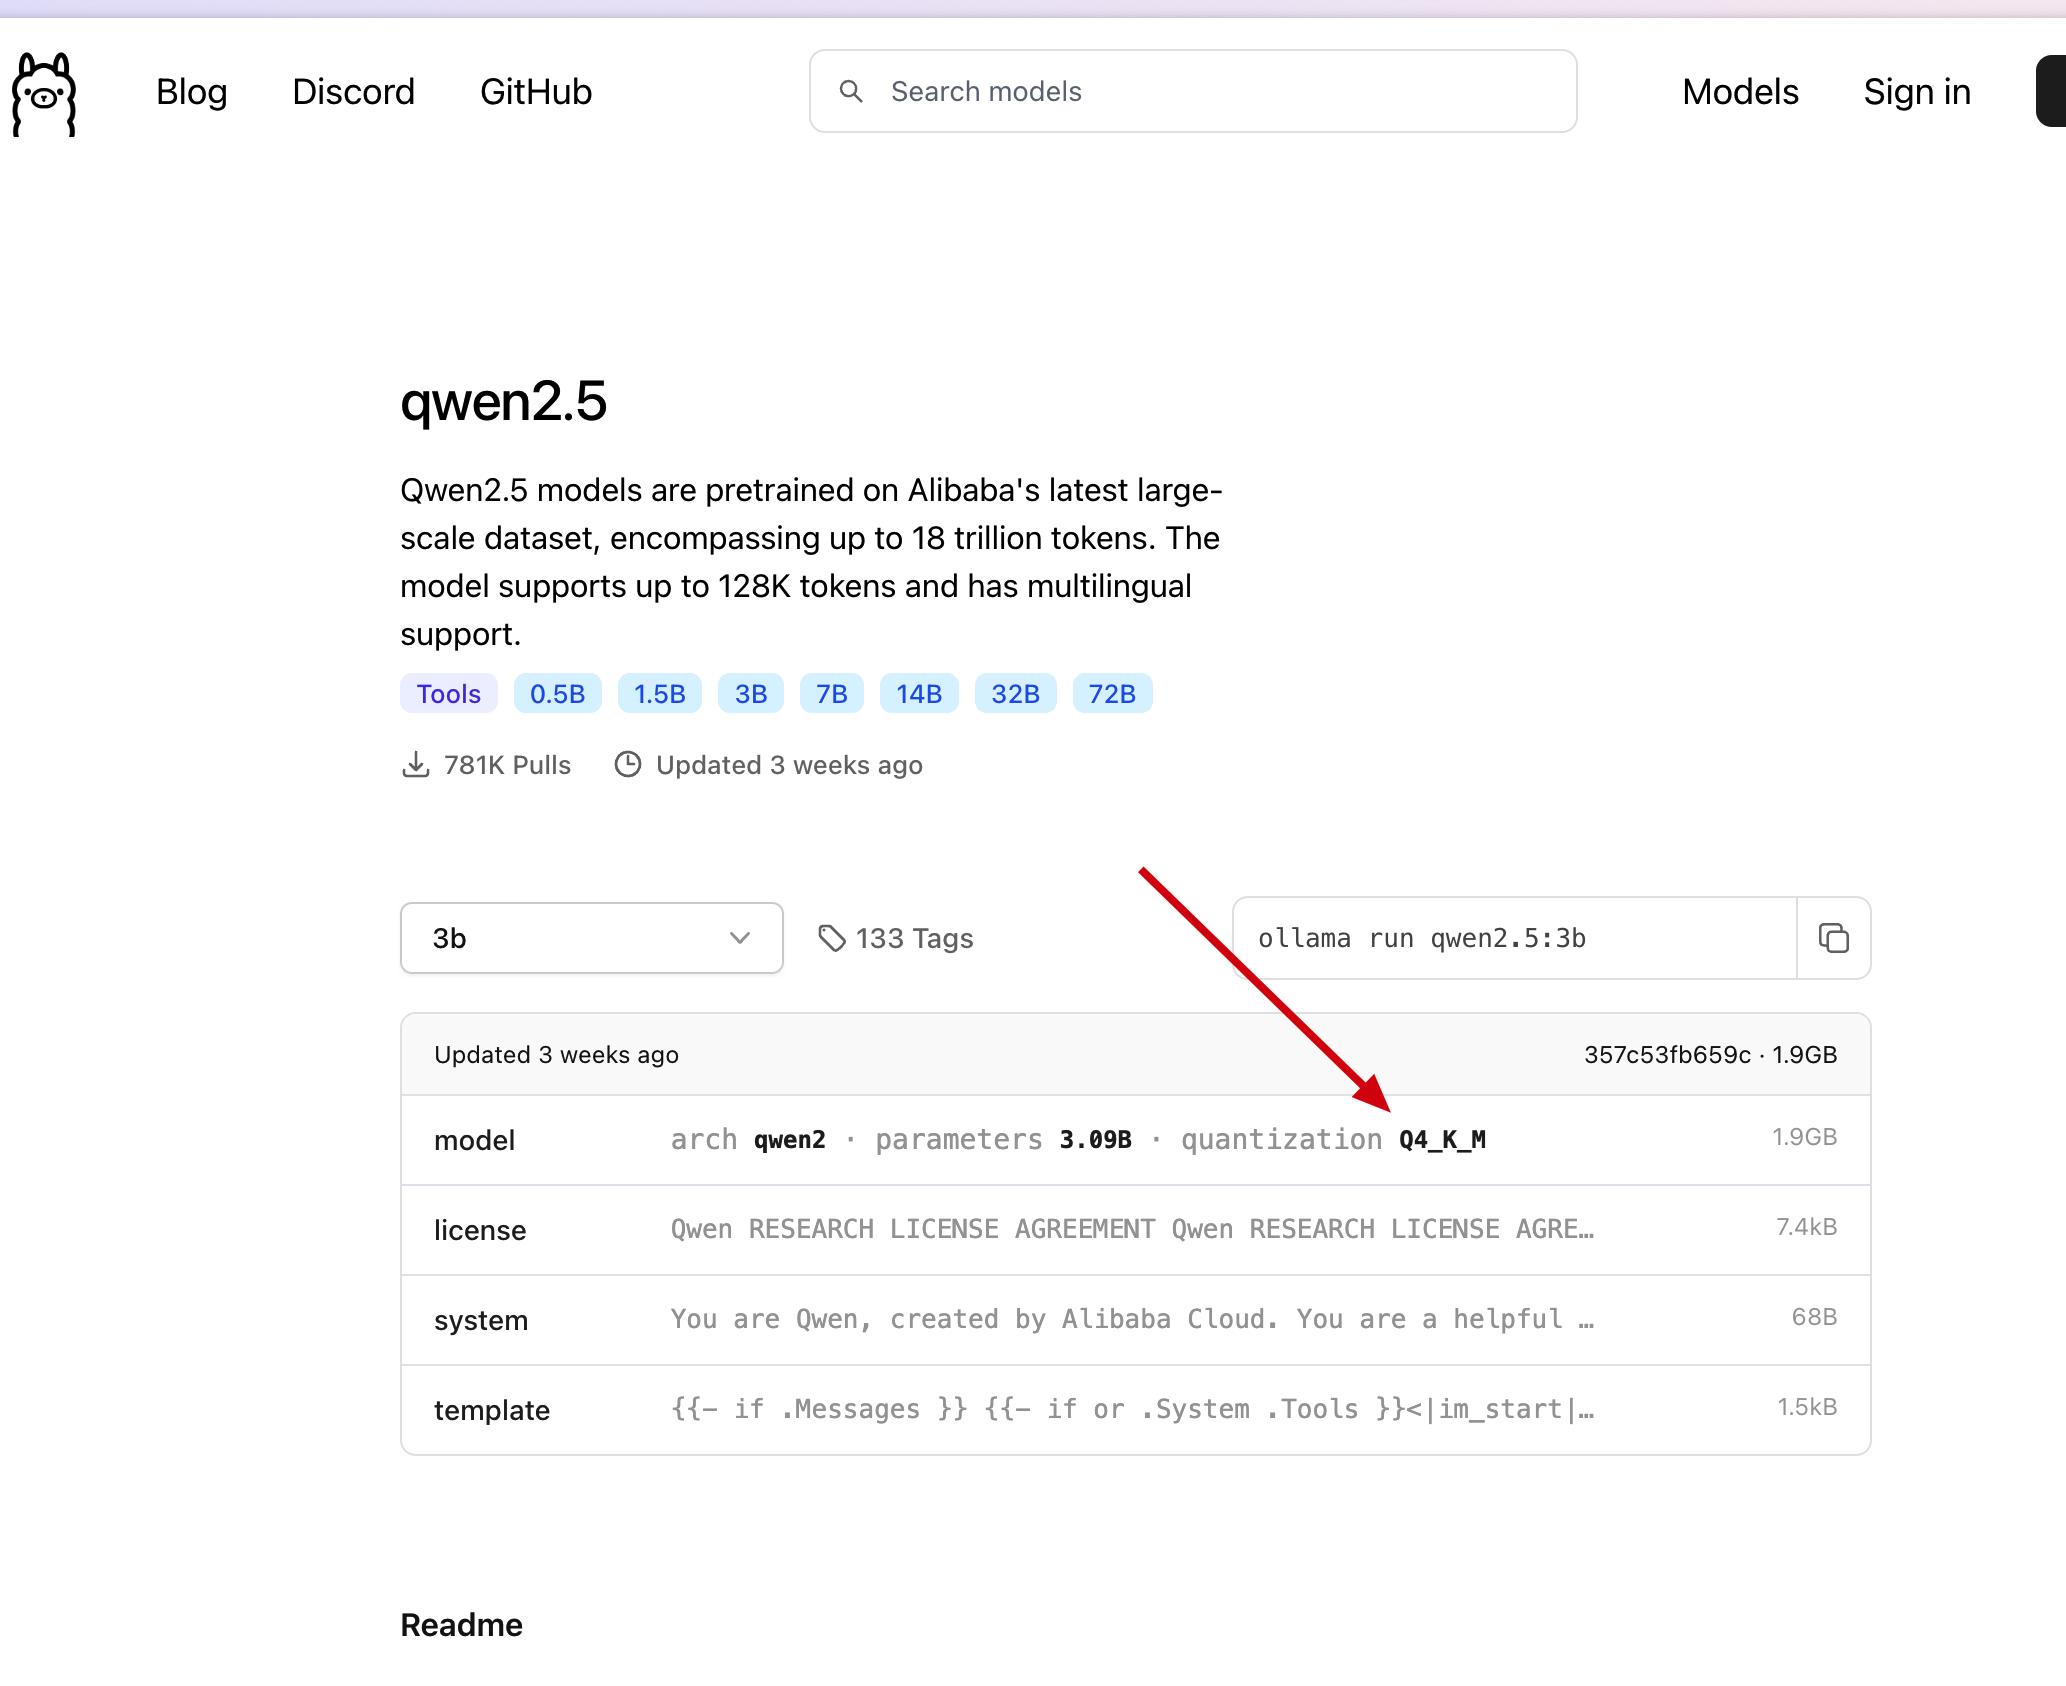
具体选那个微调版本都可以, 我们这里参考 ollama 上选择的模型版本, 如下图
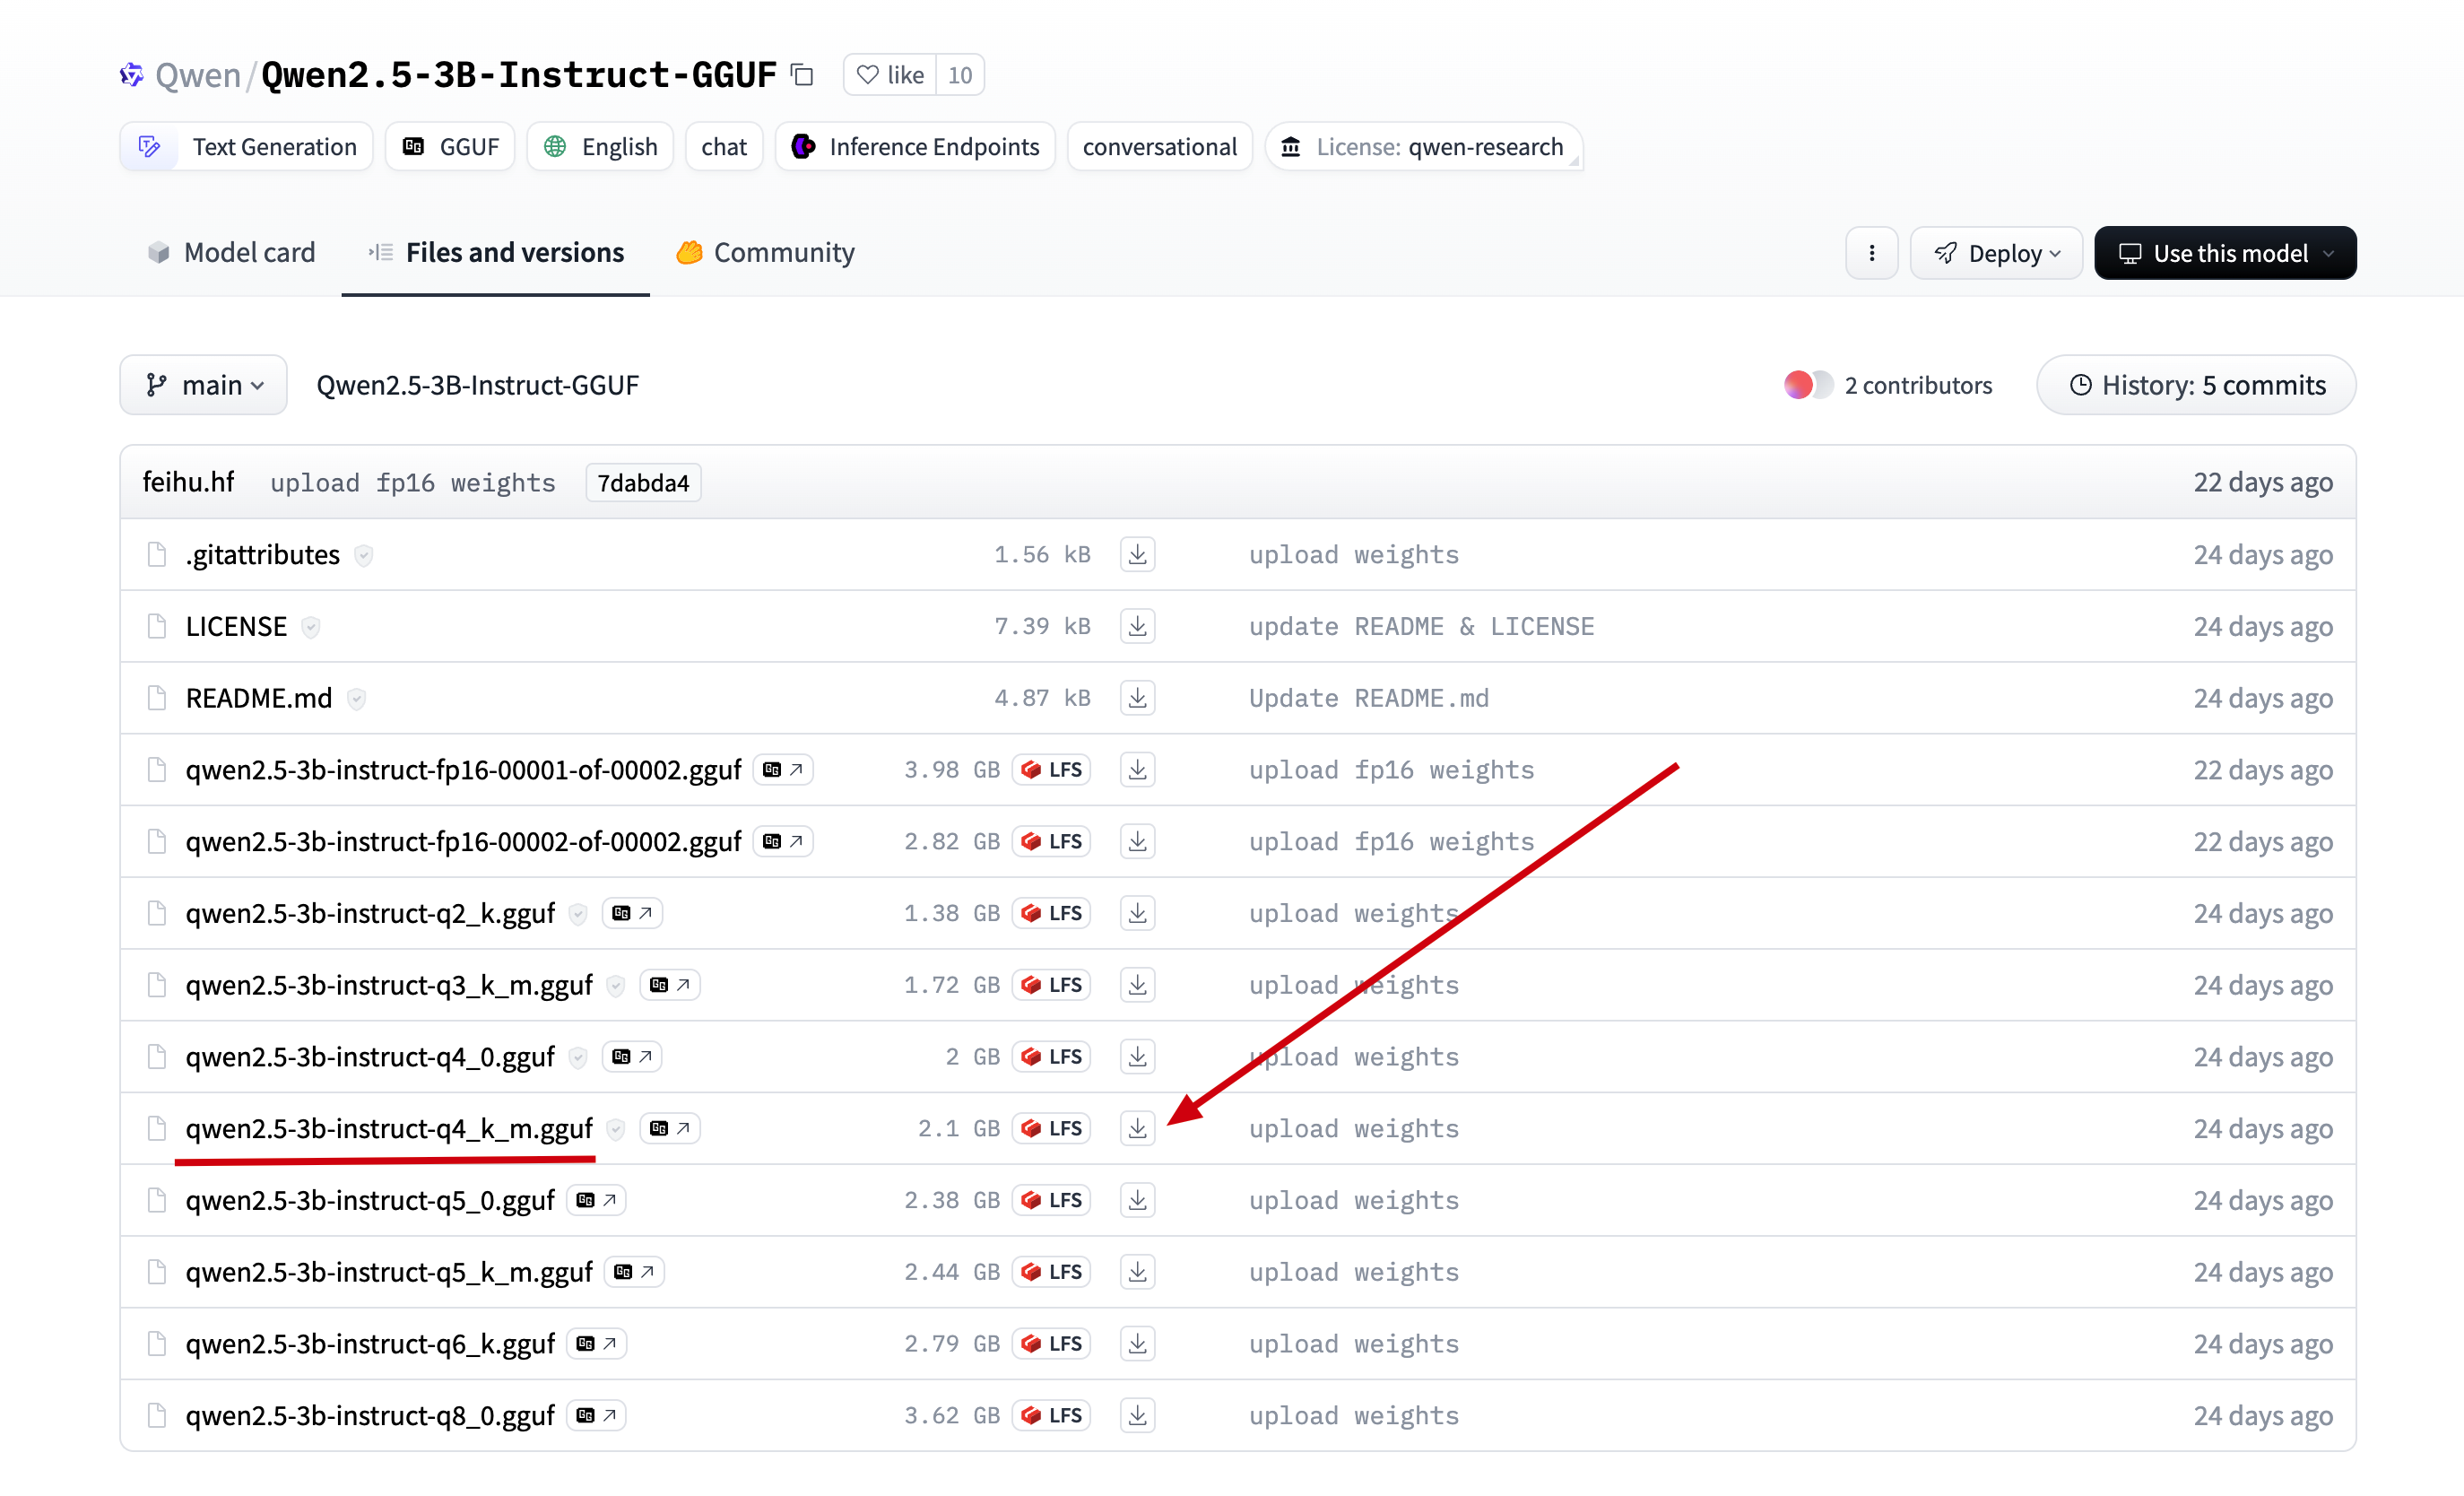
我们直接在刚才找到的模型中, 点击 Files and versions, 找到在 ollama 中找到的版本, 点击下载
2.将下载后的文件上传到服务器的目录 /data/ollama, 并重命名为 qwen2.5-3b.gguf, (重命名为了方便后面引用)
3.在 /data/ollama 目录下创建文件 Modelfile, 添加如下内容
# 上一步的模型名
FROM ./qwen2.5-3b.gguf

# 可以到 ollama 网站上的模型库去寻找, 如 qwen2.5-3b 的模板地址: https://ollama.com/library/qwen2.5:3b/blobs/eb4402837c78
# 直接复制 ollama 上的 Template 到如下三个双引号中间
TEMPLATE """{{- if .Messages }}
{{- if or .System .Tools }}<|im_start|>system
{{- if .System }}
{{ .System }}
{{- end }}
{{- if .Tools }}

# Tools

You may call one or more functions to assist with the user query.

You are provided with function signatures within <tools></tools> XML tags:
<tools>
{{- range .Tools }}
{"type": "function", "function": {{ .Function }}}
{{- end }}
</tools>

For each function call, return a json object with function name and arguments within <tool_call></tool_call> XML tags:
<tool_call>
{"name": <function-name>, "arguments": <args-json-object>}
</tool_call>
{{- end }}<|im_end|>
{{ end }}
{{- range $i, $_ := .Messages }}
{{- $last := eq (len (slice $.Messages $i)) 1 -}}
{{- if eq .Role "user" }}<|im_start|>user
{{ .Content }}<|im_end|>
{{ else if eq .Role "assistant" }}<|im_start|>assistant
{{ if .Content }}{{ .Content }}
{{- else if .ToolCalls }}<tool_call>
{{ range .ToolCalls }}{"name": "{{ .Function.Name }}", "arguments": {{ .Function.Arguments }}}
{{ end }}</tool_call>
{{- end }}{{ if not $last }}<|im_end|>
{{ end }}
{{- else if eq .Role "tool" }}<|im_start|>user
<tool_response>
{{ .Content }}
</tool_response><|im_end|>
{{ end }}
{{- if and (ne .Role "assistant") $last }}<|im_start|>assistant
{{ end }}
{{- end }}
{{- else }}
{{- if .System }}<|im_start|>system
{{ .System }}<|im_end|>
{{ end }}{{ if .Prompt }}<|im_start|>user
{{ .Prompt }}<|im_end|>
{{ end }}<|im_start|>assistant
{{ end }}{{ .Response }}{{ if .Response }}<|im_end|>{{ end }}
"""

# 这一步参考 ollama 上的 parameters, 但是 ollama 上的 qwen2.5-3b 是没有参数的, 按照下面的格式添加即可
PARAMETER stop "<|im_start|>"
PARAMETER stop "<|im_end|>"
4.执行如下命令, 加载并运行离线模型
# 通过模型描述文件, 创建并运行 qwen2.5 模型
ollama create qwen2.5 -f Modelfile
# 查看模型运行列表, 是否正在运行
ollama ls

# 通过 api 调用模型, 检测模型是否运行正常
curl --location --request POST 'http://127.0.0.1:11434/api/generate' \
--header 'Content-Type: application/json' \
--data '{
    "model": "qwen2.5",
    "stream": false,
    "prompt": "你好, 24节气的第一个节气是什么?"
}' \
-w "Time Total: %{time_total}s\n"
如下图, 正常返回回答内容, 表示模型成功安装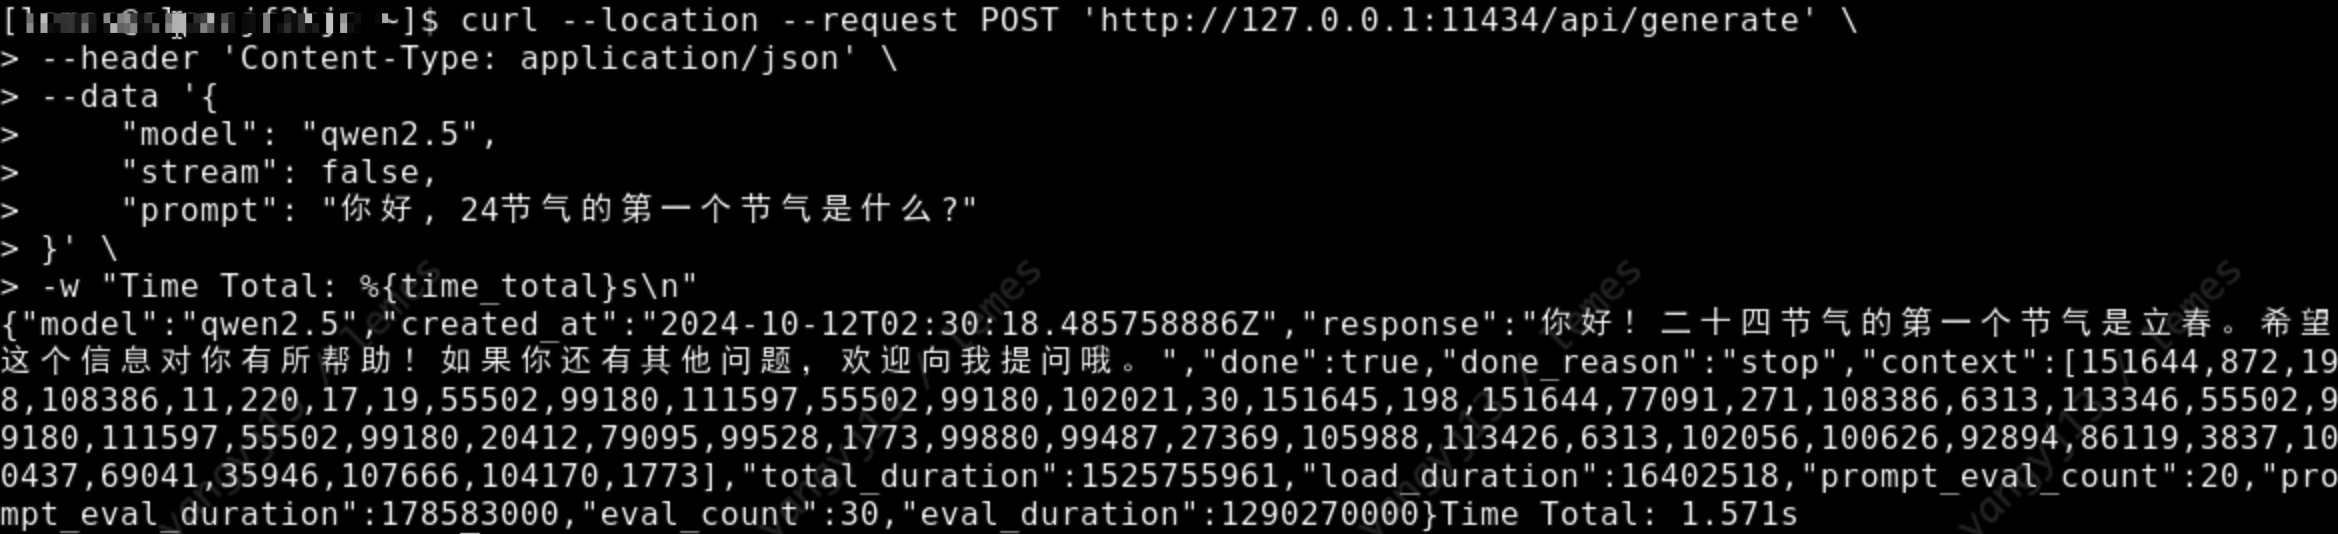
Llama3.2-3b
1.下载模型, 可以到 huggingface 上搜索对应模型的 gguf 版本, 如搜索 llama3.2-3b-gguf
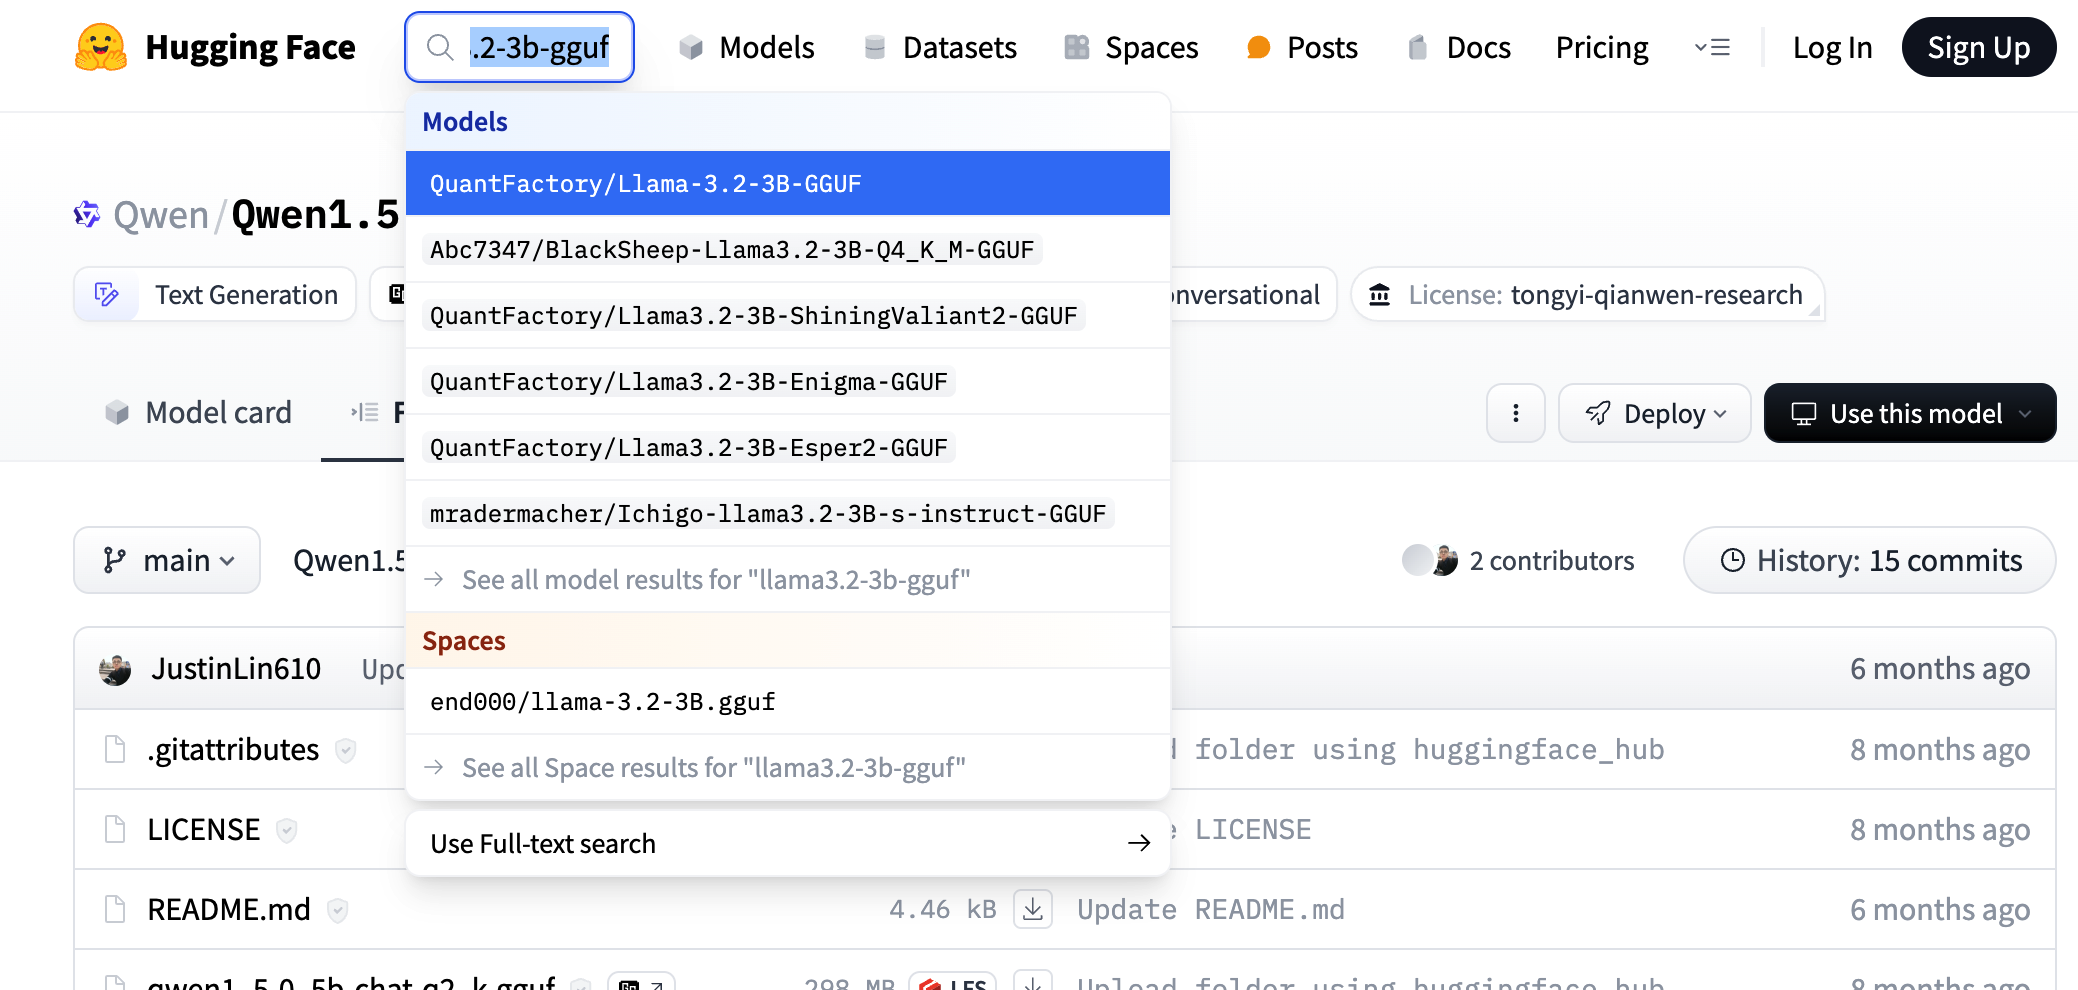
具体选那个微调版本都可以, 我们这里参考 ollama 上选择的模型版本, 如下图
我们直接在刚才找到的模型中, 点击 Files and versions, 找到在 ollama 中找到的版本, 点击下载
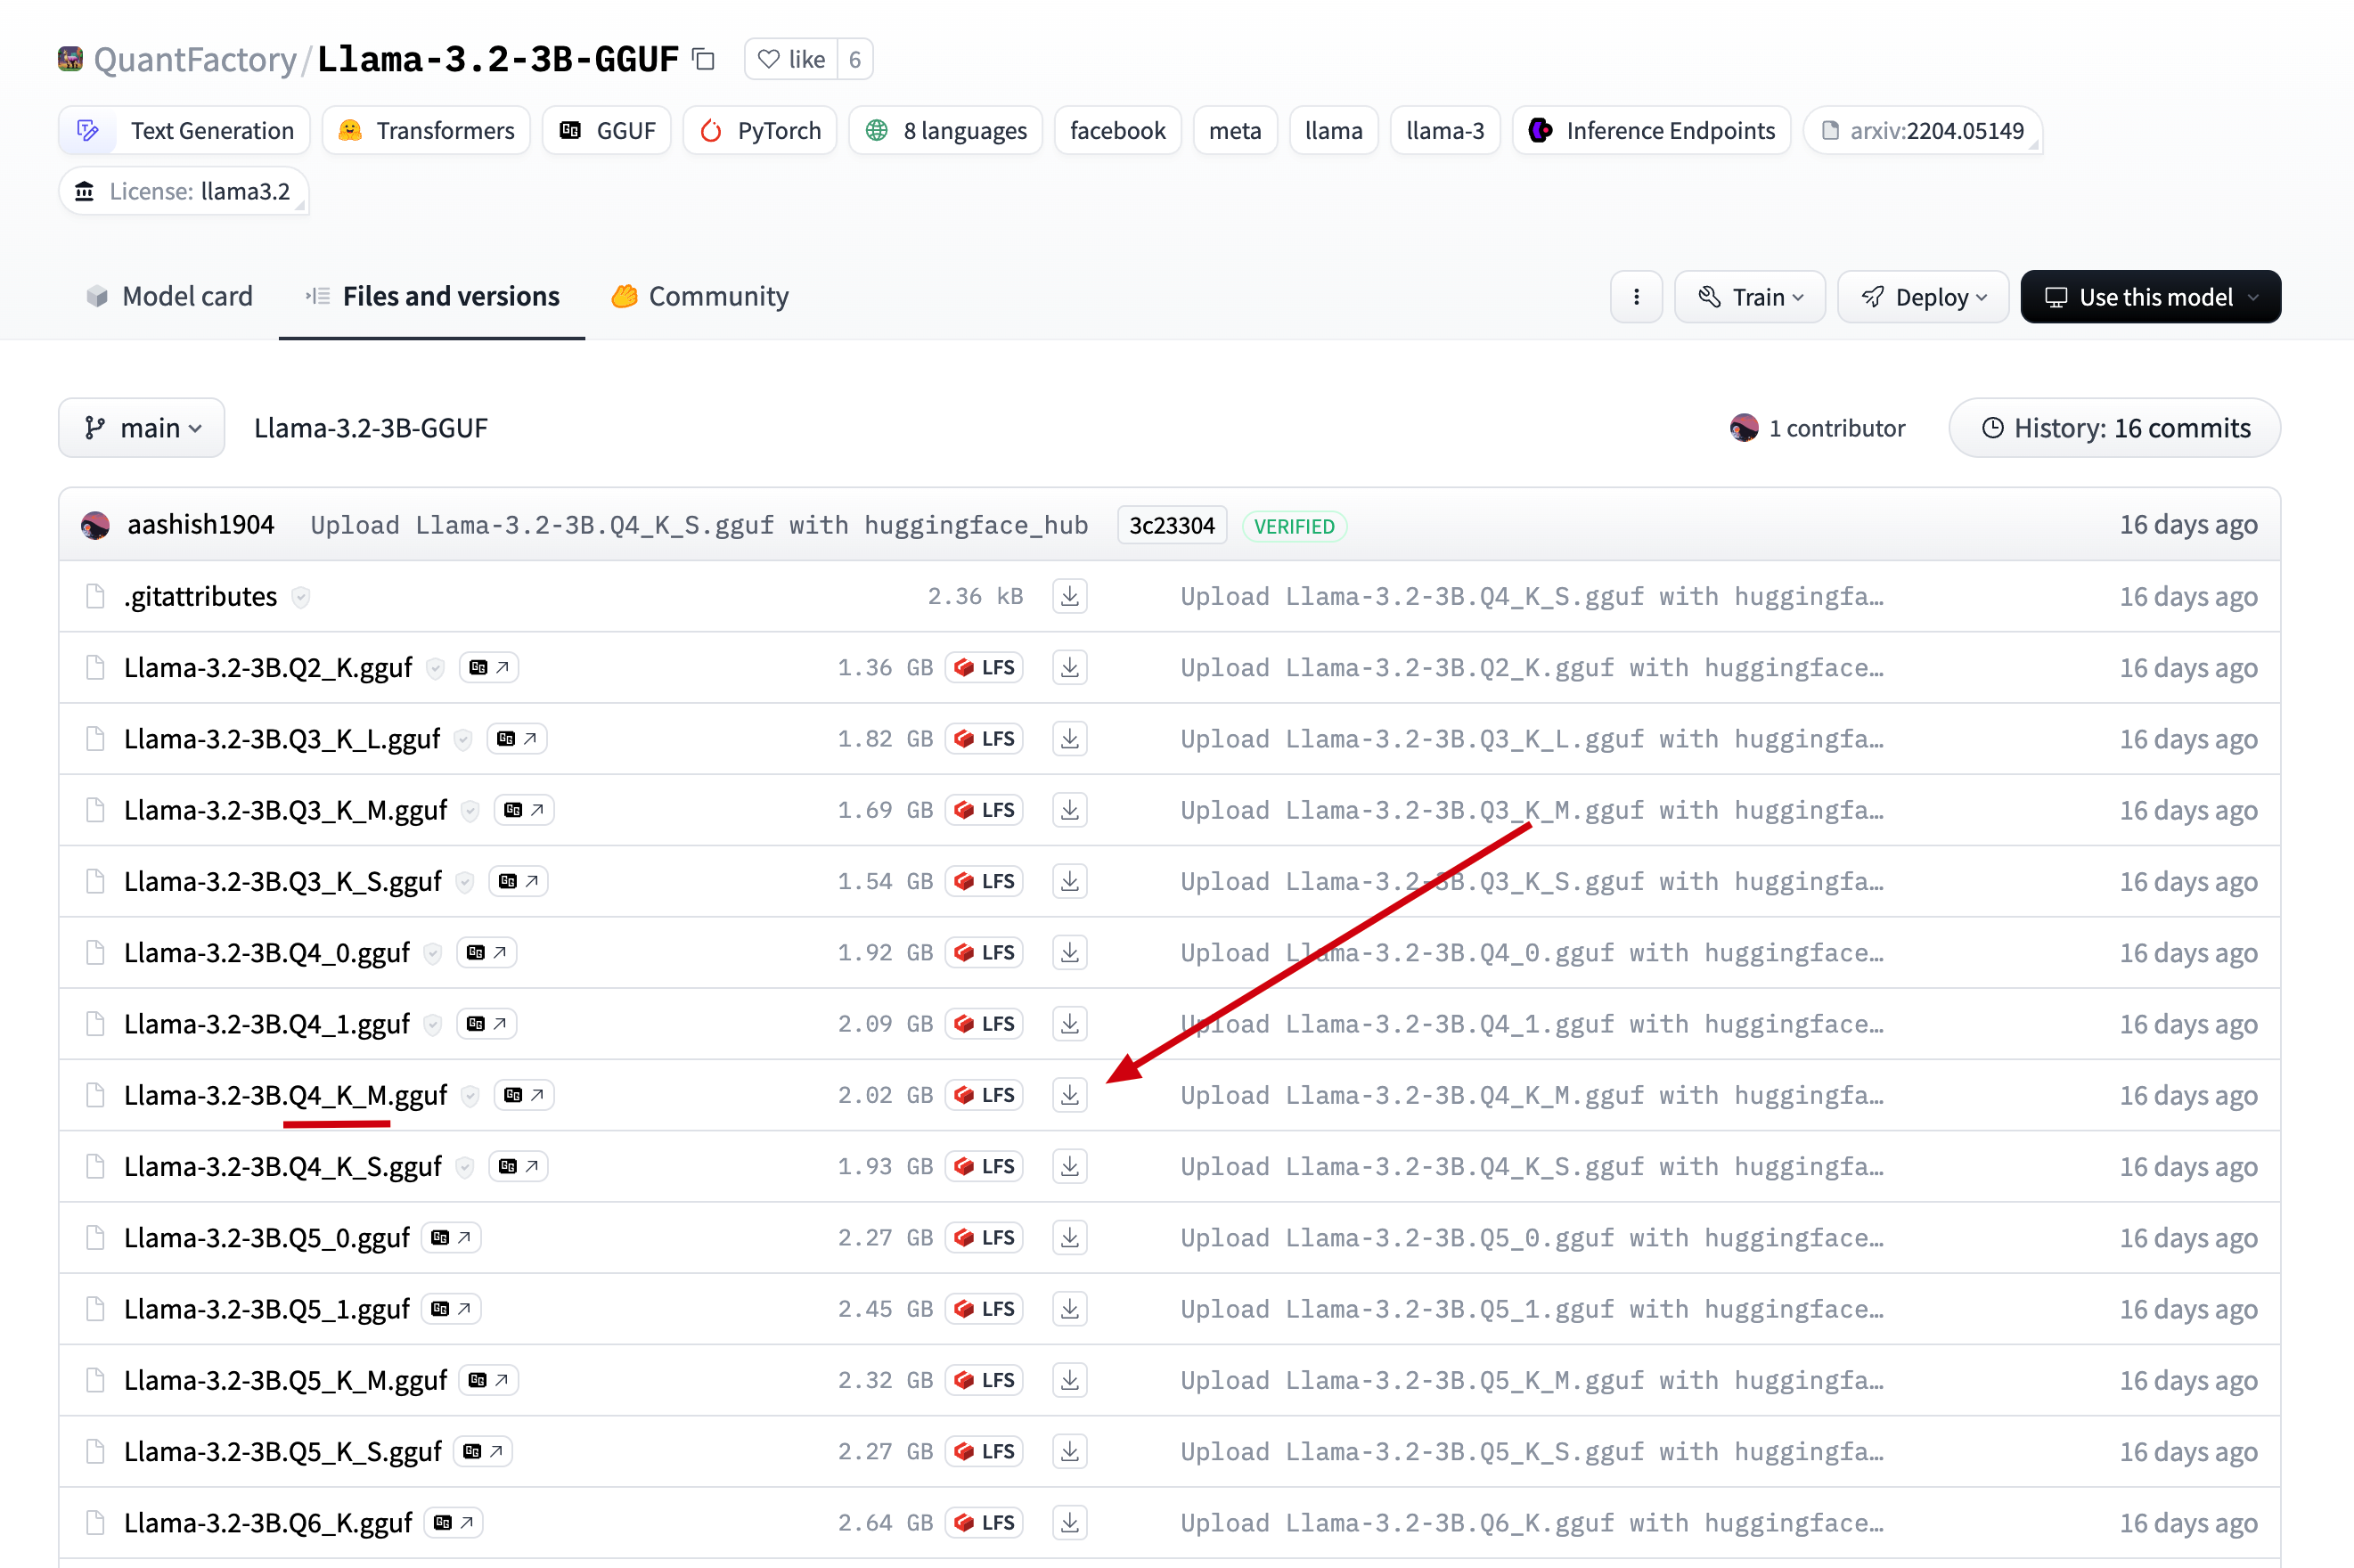
2.将下载后的文件上传到服务器的目录 /data/ollama, 并重命名为 llama3.2-3b.gguf, (重命名为了方便后面引用)
3.在 /data/ollama 目录下创建文件 Modelfile, 添加如下内容
# 上一步的模型名
FROM ./llama3.2-3b.gguf
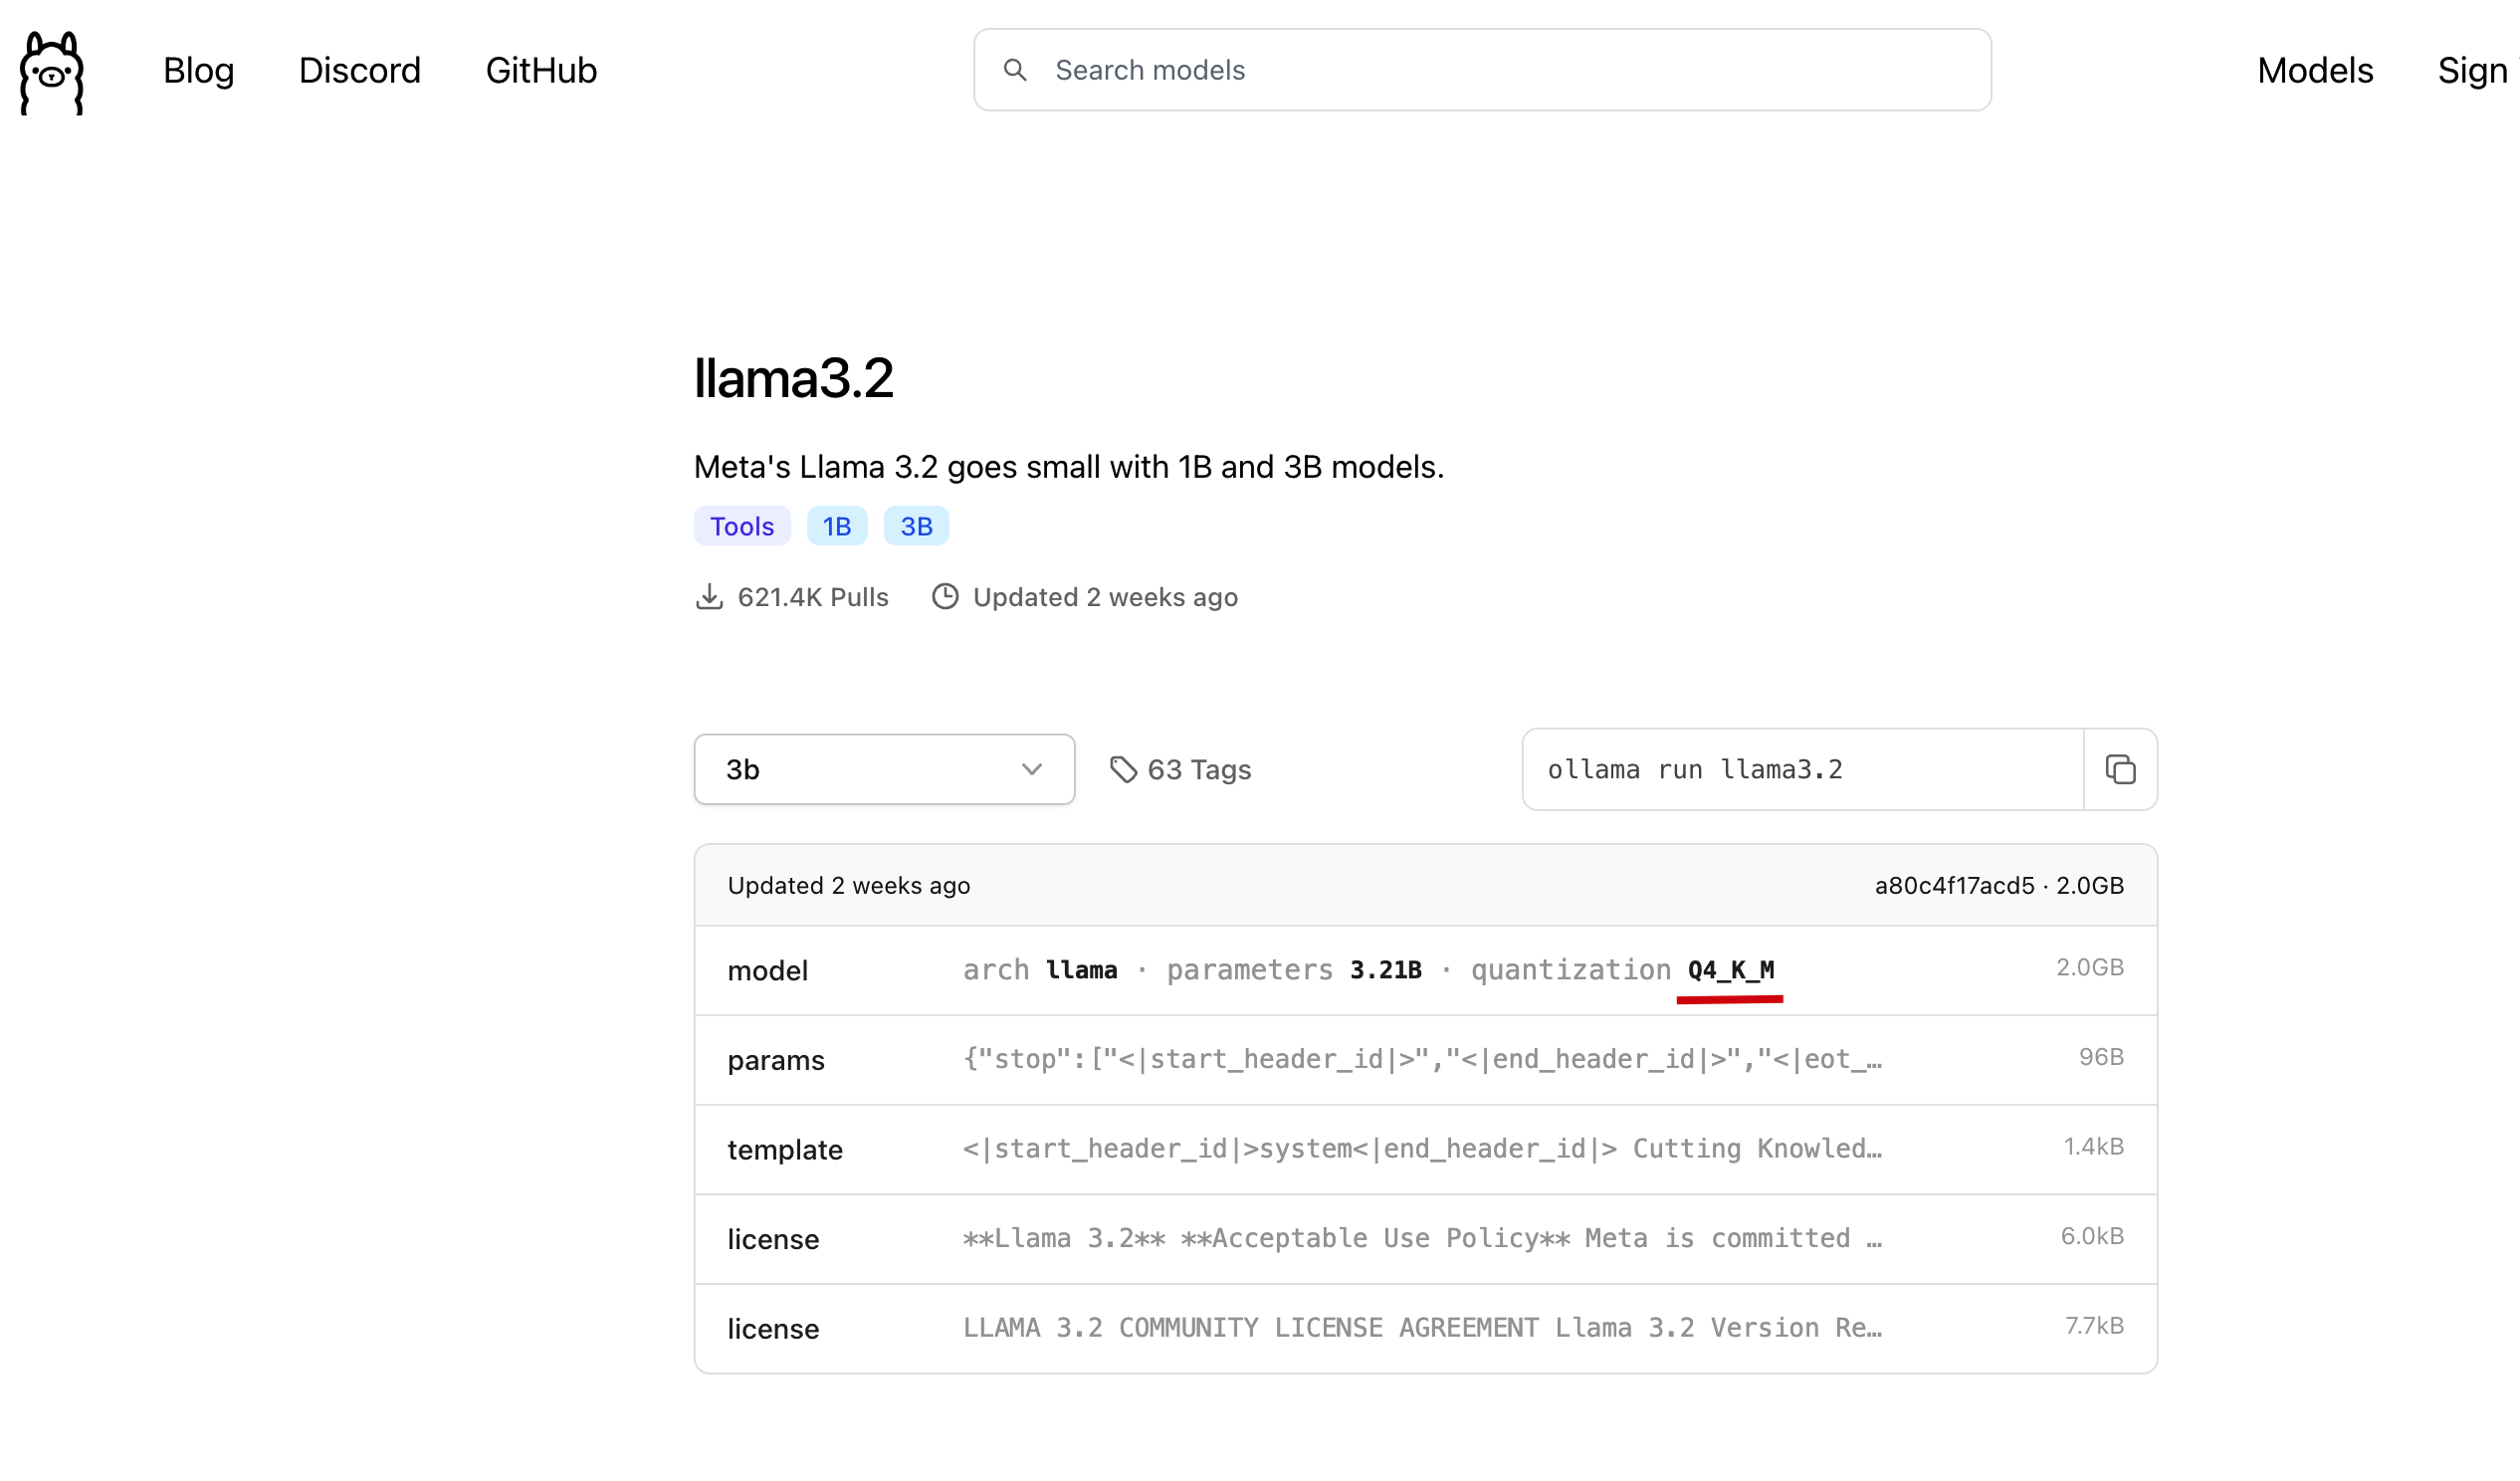
# 可以到 ollama 网站上的模型库去寻找, 如 llama3.2-3b 的模板地址: https://ollama.com/library/llama3.2/blobs/966de95ca8a6
# 直接复制 ollama 上的 Template 到如下三个双引号中间
TEMPLATE """<|start_header_id|>system<|end_header_id|>
Cutting Knowledge Date: December 2023
{{ if .System }}{{ .System }}
{{- end }}
{{- if .Tools }}When you receive a tool call response, use the output to format an answer to the orginal user question.
You are a helpful assistant with tool calling capabilities.
{{- end }}<|eot_id|>
{{- range $i, $_ := .Messages }}
{{- $last := eq (len (slice $.Messages $i)) 1 }}
{{- if eq .Role "user" }}<|start_header_id|>user<|end_header_id|>
{{- if and $.Tools $last }}
Given the following functions, please respond with a JSON for a function call with its proper arguments that best answers the given prompt.
Respond in the format {"name": function name, "parameters": dictionary of argument name and its value}. Do not use variables.
{{ range $.Tools }}
{{- . }}
{{ end }}
{{ .Content }}<|eot_id|>
{{- else }}
{{ .Content }}<|eot_id|>
{{- end }}{{ if $last }}<|start_header_id|>assistant<|end_header_id|>
{{ end }}
{{- else if eq .Role "assistant" }}<|start_header_id|>assistant<|end_header_id|>
{{- if .ToolCalls }}
{{ range .ToolCalls }}
{"name": "{{ .Function.Name }}", "parameters": {{ .Function.Arguments }}}{{ end }}
{{- else }}
{{ .Content }}
{{- end }}{{ if not $last }}<|eot_id|>{{ end }}
{{- else if eq .Role "tool" }}<|start_header_id|>ipython<|end_header_id|>
{{ .Content }}<|eot_id|>{{ if $last }}<|start_header_id|>assistant<|end_header_id|>
{{ end }}
{{- end }}
{{- end }}
"""
# 这一步参考 ollama 上的 parameters, llama3.2-3b 的 params: https://ollama.com/library/llama3.2/blobs/56bb8bd477a5
PARAMETER stop "<|start_header_id|>"
PARAMETER stop "<|end_header_id|>"
PARAMETER stop "<|eot_id|>"
4.执行如下命令, 加载并运行离线模型
# 通过模型描述文件, 创建并运行 qwen2.5 模型
ollama create llama3.2 -f Modelfile
# 查看模型运行列表, 是否正在运行
ollama ls

# 通过 api 调用模型, 检测模型是否运行正常
curl --location --request POST 'http://127.0.0.1:11434/api/generate' \
--header 'Content-Type: application/json' \
--data '{
    "model": "llama3.2",
    "stream": false,
    "prompt": "你好, 24节气的第一个节气是什么?"
}' \
-w "Time Total: %{time_total}s\n"
如下图, 正常返回回答内容, 表示模型成功安装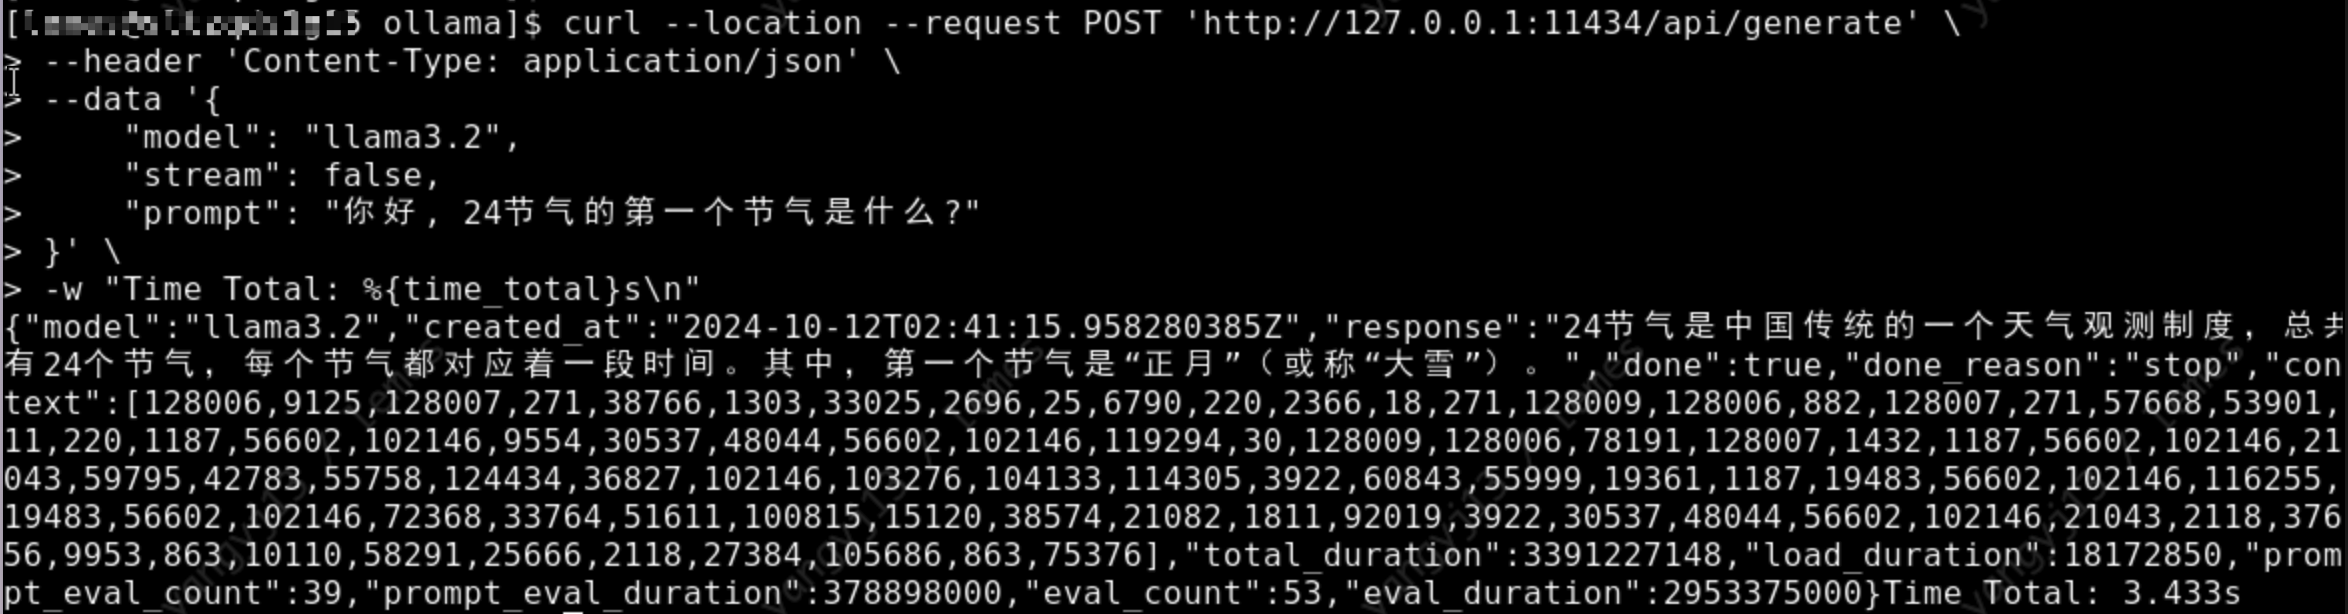
最后
Ollama 是非常好用的模型安装工具, 希望大家玩的开心! 如果安装有问题或者有什么使用技巧都可以在评论区交流~~~
转载请注明来源,欢迎对文章中的引用来源进行考证,欢迎指出任何有错误或不够清晰的表达。可以在下面评论区评论,也可以邮件至 [email protected]

