在SpringMVC中主要是围绕着DispatcherServlet来设计,可以把它当做指挥中心。这里先说明一下SpringMVC文档给出的执行流程,然后是我们稍微具体的执行流程,最后是流程大致的源码跟踪。关于很很很详细的源码解析,这里暂先不做。
官方文档中的流程
首先看下SpringMVC文档上给的流程图: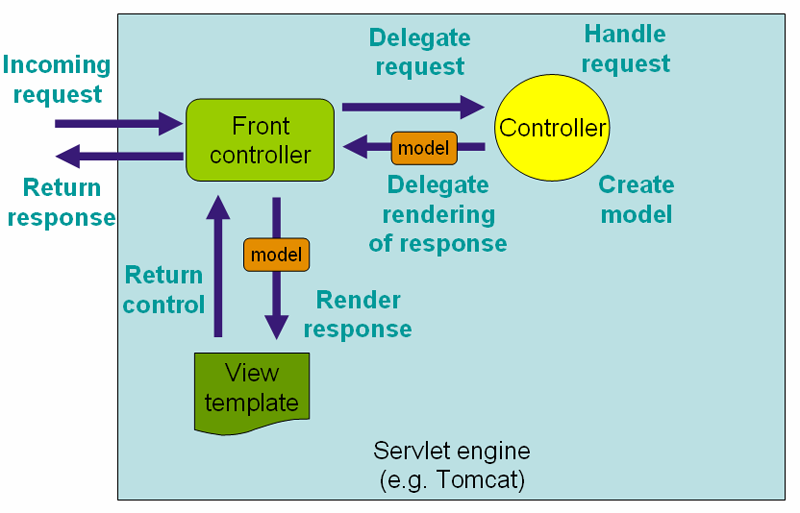
这张图片给了我们大概的执行流程:
- 用户请求首先发送到前端控制器DispatcherServlet,DispatcherServlet根据请求的信息来决定使用哪个页面控制器Controller(也就是我们通常编写的Controller)来处理该请求。找到控制器之后,DispatcherServlet将请求委托给控制器去处理。
- 接下来页面控制器开始处理用户请求,页面控制器会根据请求信息进行处理,调用业务层等等,处理完成之后,会把结果封装成一个ModelAndView返回给DispatcherServlet。
- 前端控制器DispatcherServlet接到页面控制器的返回结果后,根据返回的视图名选择相应的试图模板,并根据返回的数据进行渲染。
- 最后前端控制器DispatcherServlet将结果返回给用户。
更具体的流程
上面只是总体流程,接下来我们稍微深入一点,看下更具体的流程,这里没有图,只有步骤解析:
- 用户请求发送到前端控制器DispatcherServlet。
- 前端控制器DispatcherServlet接收到请求后,DispatcherServlet会使用HandlerMapping来处理,HandlerMapping会查找到具体进行处理请求的Handler对象。
- HandlerMapping找到对应的Handler之后,并不是返回一个Handler原始对象,而是一个Handler执行链,在这个执行链中包括了拦截器和处理请求的Handler。HandlerMapping返回一个执行链给DispatcherServlet。
- DispatcherServlet接收到执行链之后,会调用Handler适配器去执行Handler。
- Handler适配器执行完成Handler(也就是我们写的Controller)之后会得到一个ModelAndView,并返回给DispatcherServlet。
- DispatcherServlet接收到Handler适配器返回的ModelAndView之后,会根据其中的视图名调用视图解析器。
- 视图解析器根据逻辑视图名解析成一个真正的View视图,并返回给DispatcherServlet。
- DispatcherServlet接收到视图之后,会根据上面的ModelAndView中的model来进行视图中数据的填充,也就是所谓的视图渲染。
- 渲染完成之后,DispatcherServlet就可以将结果返回给用户了。
源码
DispatcherServlet是一个Servlet,我们知道在Servlet在处理一个请求的时候会交给service方法进行处理,这里也不例外,DispatcherServlet继承了FrameworkServlet,首先进入FrameworkServlet的service方法:
protected void service(HttpServletRequest request, HttpServletResponse response)
        throws ServletException, IOException {
    //请求方法
    String method = request.getMethod();
    //PATCH方法单独处理
    if (method.equalsIgnoreCase(RequestMethod.PATCH.name())) {
        processRequest(request, response);
    }
    else {//其他的请求类型的方法经由父类,也就是HttpServlet处理
        super.service(request, response);
    }
}
HttpServlet中会根据请求类型的不同分别调用doGet或者doPost等方法,FrameworkServlet中已经重写了这些方法,在这些方法中会调用processRequest进行处理,在processRequest中会调用doService方法,这个doService方法就是在DispatcherServlet中实现的。下面就看下DispatcherServlet中的doService方法的实现。
请求到达DispatcherServlet
doService方法:
protected void doService(HttpServletRequest request, HttpServletResponse response) throws Exception {

    //给request中的属性做一份快照
    Map<String, Object> attributesSnapshot = null;
    if (WebUtils.isIncludeRequest(request)) {
        logger.debug("Taking snapshot of request attributes before include");
        attributesSnapshot = new HashMap<String, Object>();
        Enumeration<?> attrNames = request.getAttributeNames();
        while (attrNames.hasMoreElements()) {
            String attrName = (String) attrNames.nextElement();
            if (this.cleanupAfterInclude || attrName.startsWith("org.springframework.web.servlet")) {
                attributesSnapshot.put(attrName, request.getAttribute(attrName));
            }
        }
    }

    //如果我们没有配置类似本地化或者主题的处理器之类的
    //SpringMVC会使用默认的值
    //默认配置文件是DispatcherServlet.properties
    request.setAttribute(WEB_APPLICATION_CONTEXT_ATTRIBUTE, getWebApplicationContext());
    request.setAttribute(LOCALE_RESOLVER_ATTRIBUTE, this.localeResolver);
    request.setAttribute(THEME_RESOLVER_ATTRIBUTE, this.themeResolver);
    request.setAttribute(THEME_SOURCE_ATTRIBUTE, getThemeSource());

    FlashMap inputFlashMap = this.flashMapManager.retrieveAndUpdate(request, response);
    if (inputFlashMap != null) {
        request.setAttribute(INPUT_FLASH_MAP_ATTRIBUTE, Collections.unmodifiableMap(inputFlashMap));
    }
    request.setAttribute(OUTPUT_FLASH_MAP_ATTRIBUTE, new FlashMap());
    request.setAttribute(FLASH_MAP_MANAGER_ATTRIBUTE, this.flashMapManager);

    try {
        //开始处理
        doDispatch(request, response);
    }
    finally {
        if (WebAsyncUtils.getAsyncManager(request).isConcurrentHandlingStarted()) {
            return;
        }
        // Restore the original attribute snapshot, in case of an include.
        if (attributesSnapshot != null) {
            restoreAttributesAfterInclude(request, attributesSnapshot);
        }
    }
}
DispatcherServlet开始真正的处理,doDispatch方法:
protected void doDispatch(HttpServletRequest request, HttpServletResponse response) throws Exception {
    HttpServletRequest processedRequest = request;
    HandlerExecutionChain mappedHandler = null;
    boolean multipartRequestParsed = false;
    //SpringMVC中异步请求的相关知识,暂先不解释
    WebAsyncManager asyncManager = WebAsyncUtils.getAsyncManager(request);

    try {
        ModelAndView mv = null;
        Exception dispatchException = null;

        try {
            //先检查是不是Multipart类型的,比如上传等
            //如果是Multipart类型的,则转换为MultipartHttpServletRequest类型
            processedRequest = checkMultipart(request);
            multipartRequestParsed = processedRequest != request;

            //获取当前请求的Handler
            mappedHandler = getHandler(processedRequest, false);
            if (mappedHandler == null || mappedHandler.getHandler() == null) {
                noHandlerFound(processedRequest, response);
                return;
            }

            //获取当前请求的Handler适配器
            HandlerAdapter ha = getHandlerAdapter(mappedHandler.getHandler());

            // 对于header中last-modified的处理
            String method = request.getMethod();
            boolean isGet = "GET".equals(method);
            if (isGet || "HEAD".equals(method)) {
                long lastModified = ha.getLastModified(request, mappedHandler.getHandler());
                if (new ServletWebRequest(request, response).checkNotModified(lastModified) && isGet) {
                    return;
                }
            }
            //拦截器的preHandle方法进行处理
            if (!mappedHandler.applyPreHandle(processedRequest, response)) {
                return;
            }

            try {
                //真正调用Handler的地方
                mv = ha.handle(processedRequest, response, mappedHandler.getHandler());
            }
            finally {
                if (asyncManager.isConcurrentHandlingStarted()) {
                    return;
                }
            }
            //处理成默认视图名,就是添加前缀和后缀等
            applyDefaultViewName(request, mv);
            //拦截器postHandle方法进行处理
            mappedHandler.applyPostHandle(processedRequest, response, mv);
        }
        catch (Exception ex) {
            dispatchException = ex;
        }
        //处理最后的结果,渲染之类的都在这里
        processDispatchResult(processedRequest, response, mappedHandler, mv, dispatchException);
    }
    catch (Exception ex) {
        triggerAfterCompletion(processedRequest, response, mappedHandler, ex);
    }
    catch (Error err) {
        triggerAfterCompletionWithError(processedRequest, response, mappedHandler, err);
    }
    finally {
        if (asyncManager.isConcurrentHandlingStarted()) {
            // Instead of postHandle and afterCompletion
            mappedHandler.applyAfterConcurrentHandlingStarted(processedRequest, response);
            return;
        }
        // Clean up any resources used by a multipart request.
        if (multipartRequestParsed) {
            cleanupMultipart(processedRequest);
        }
    }
}
可以看到大概的步骤还是按照我们上面分析的走的。
查找请求对应的Handler对象
对应着这句代码 mappedHandler = getHandler(processedRequest, false);,看下具体的getHandler方法:
protected HandlerExecutionChain getHandler(HttpServletRequest request, boolean cache) throws Exception {
    return getHandler(request);
}
继续往下看getHandler:
protected HandlerExecutionChain getHandler(HttpServletRequest request) throws Exception {
    //遍历所有的handlerMappings进行处理
    //handlerMappings是在启动的时候预先注册好的
    for (HandlerMapping hm : this.handlerMappings) {
        HandlerExecutionChain handler = hm.getHandler(request);
        if (handler != null) {
            return handler;
        }
    }
    return null;
}
继续往下看getHandler,在AbstractHandlerMapping类中:
public final HandlerExecutionChain getHandler(HttpServletRequest request) throws Exception {
    //根据request获取handler
    Object handler = getHandlerInternal(request);
    if (handler == null) {
        //如果没有找到就使用默认的handler
        handler = getDefaultHandler();
    }
    if (handler == null) {
        return null;
    }
    //如果Handler是String,表明是一个bean名称
    //需要超照对应bean
    if (handler instanceof String) {
        String handlerName = (String) handler;
        handler = getApplicationContext().getBean(handlerName);
    }
    //封装Handler执行链
    return getHandlerExecutionChain(handler, request);
}
根据requrst获取handler
首先看下根据requrst获取handler步骤getHandlerInternal方法,在AbstractHandlerMethodMapping中:
protected HandlerMethod getHandlerInternal(HttpServletRequest request) throws Exception {
    //获取request中的url,用来匹配handler
    String lookupPath = getUrlPathHelper().getLookupPathForRequest(request);
    //根据路径寻找Handler
    HandlerMethod handlerMethod = lookupHandlerMethod(lookupPath, request);
    //根据handlerMethod中的bean来实例化Handler并添加进HandlerMethod
    return (handlerMethod != null) ? handlerMethod.createWithResolvedBean() : null;
}
看下根据路径寻找handler的方法lookupHandlerMethod:
protected HandlerMethod lookupHandlerMethod(String lookupPath, HttpServletRequest request) throws Exception {
    List<Match> matches = new ArrayList<Match>();
    //直接匹配
    List<T> directPathMatches = this.urlMap.get(lookupPath);
    //如果有匹配的,就添加进匹配列表中
    if (directPathMatches != null) {
        addMatchingMappings(directPathMatches, matches, request);
    }
    //还没有匹配的,就遍历所有的处理方法查找
    if (matches.isEmpty()) {
        // No choice but to go through all mappings
        addMatchingMappings(this.handlerMethods.keySet(), matches, request);
    }
    //找到了匹配的
    if (!matches.isEmpty()) {
        Comparator<Match> comparator = new MatchComparator(getMappingComparator(request));
        Collections.sort(matches, comparator);
        //排序之后,获取第一个
        Match bestMatch = matches.get(0);
        //如果有多个匹配的,会找到第二个最合适的进行比较一下
        if (matches.size() > 1) {
            Match secondBestMatch = matches.get(1);
            if (comparator.compare(bestMatch, secondBestMatch) == 0) {
                Method m1 = bestMatch.handlerMethod.getMethod();
                Method m2 = secondBestMatch.handlerMethod.getMethod();
                throw new IllegalStateException(
                        "Ambiguous handler methods mapped for HTTP path '" + request.getRequestURL() + "': {" +
                        m1 + ", " + m2 + "}");
            }
        }
        //设置request参数
        handleMatch(bestMatch.mapping, lookupPath, request);
        //返回匹配的url的处理的方法
        return bestMatch.handlerMethod;
    }
    else {//最后还没有找到,返回null
        return handleNoMatch(handlerMethods.keySet(), lookupPath, request);
    }
}
获取默认Handler
如果上面没有获取到Handler,就会获取默认的Handler。如果还获取不到就返回null。
处理String类型的Handler
如果上面处理完的Handler是String类型的,就会根据这个handlerName获取bean。
封装Handler执行链
上面获取完Handler,就开始封装执行链了,就是将我们配置的拦截器加入到执行链中去,getHandlerExecutionChain:
protected HandlerExecutionChain getHandlerExecutionChain(Object handler, HttpServletRequest request) {
    //如果当前Handler不是执行链类型,就使用一个新的执行链实例封装起来
    HandlerExecutionChain chain =
        (handler instanceof HandlerExecutionChain) ?
            (HandlerExecutionChain) handler : new HandlerExecutionChain(handler);
    //先获取适配类型的拦截器添加进去拦截器链
    chain.addInterceptors(getAdaptedInterceptors());
    //当前的url
    String lookupPath = urlPathHelper.getLookupPathForRequest(request);
    //遍历拦截器,找到跟当前url对应的,添加进执行链中去
    for (MappedInterceptor mappedInterceptor : mappedInterceptors) {
        if (mappedInterceptor.matches(lookupPath, pathMatcher)) {
            chain.addInterceptor(mappedInterceptor.getInterceptor());
        }
    }

    return chain;
}
获取对应请求的Handler适配器
getHandlerAdapter:
protected HandlerAdapter getHandlerAdapter(Object handler) throws ServletException {
    //遍历所有的HandlerAdapter,找到和当前Handler匹配的就返回
    //我们这里会匹配到RequestMappingHandlerAdapter
    for (HandlerAdapter ha : this.handlerAdapters) {
        if (ha.supports(handler)) {
            return ha;
        }
    }
}
缓存的处理
也就是对last-modified的处理
执行拦截器的preHandle方法
就是遍历所有的我们定义的interceptor,执行preHandle方法
使用Handler适配器执行当前的Handler
ha.handle执行当前Handler,我们这里使用的是RequestMappingHandlerAdapter,首先会进入AbstractHandlerMethodAdapter的handle方法:
public final ModelAndView handle(HttpServletRequest request, HttpServletResponse response, Object handler)
        throws Exception {
    return handleInternal(request, response, (HandlerMethod) handler);
}
handleInternal方法,在RequestMappingHandlerAdapter中:
protected final ModelAndView handleInternal(HttpServletRequest request,
        HttpServletResponse response, HandlerMethod handlerMethod) throws Exception {

    if (getSessionAttributesHandler(handlerMethod).hasSessionAttributes()) {
        // Always prevent caching in case of session attribute management.
        checkAndPrepare(request, response, this.cacheSecondsForSessionAttributeHandlers, true);
    }
    else {
        // Uses configured default cacheSeconds setting.
        checkAndPrepare(request, response, true);
    }

    // Execute invokeHandlerMethod in synchronized block if required.
    if (this.synchronizeOnSession) {
        HttpSession session = request.getSession(false);
        if (session != null) {
            Object mutex = WebUtils.getSessionMutex(session);
            synchronized (mutex) {
                return invokeHandleMethod(request, response, handlerMethod);
            }
        }
    }
    //执行方法,封装ModelAndView
    return invokeHandleMethod(request, response, handlerMethod);
}
组装默认视图名称
前缀和后缀名都加上
执行拦截器的postHandle方法
遍历intercepter的postHandle方法。
处理最后的结果,渲染之类的
processDispatchResult方法:
private void processDispatchResult(HttpServletRequest request, HttpServletResponse response,
        HandlerExecutionChain mappedHandler, ModelAndView mv, Exception exception) throws Exception {

    boolean errorView = false;

    if (exception != null) {
        if (exception instanceof ModelAndViewDefiningException) {
            mv = ((ModelAndViewDefiningException) exception).getModelAndView();
        }
        else {
            Object handler = (mappedHandler != null ? mappedHandler.getHandler() : null);
            mv = processHandlerException(request, response, handler, exception);
            errorView = (mv != null);
        }
    }

    // Did the handler return a view to render?
    if (mv != null && !mv.wasCleared()) {
        //渲染
        render(mv, request, response);
        if (errorView) {
            WebUtils.clearErrorRequestAttributes(request);
        }
    }
    else {
    }

    if (WebAsyncUtils.getAsyncManager(request).isConcurrentHandlingStarted()) {
        // Concurrent handling started during a forward
        return;
    }

    if (mappedHandler != null) {
        mappedHandler.triggerAfterCompletion(request, response, null);
    }
}
重点看下render方法,进行渲染:
protected void render(ModelAndView mv, HttpServletRequest request, HttpServletResponse response) throws Exception {
    //设置本地化
    Locale locale = this.localeResolver.resolveLocale(request);
    response.setLocale(locale);

    View view;
    if (mv.isReference()) {
        //解析视图名,得到视图
        view = resolveViewName(mv.getViewName(), mv.getModelInternal(), locale, request);
    }
    else {
        // No need to lookup: the ModelAndView object contains the actual View object.
        view = mv.getView();
        if (view == null) {
            throw new ServletException("ModelAndView [" + mv + "] neither contains a view name nor a " +
                    "View object in servlet with name '" + getServletName() + "'");
        }
    }

    //委托给视图进行渲染
    view.render(mv.getModelInternal(), request, response);
}
view.render就是进行视图的渲染,然后跳转页面等处理。
到这里大概的流程就走完了。其中涉及到的东西还有很多,暂先不做详细处理。
转载请注明来源,欢迎对文章中的引用来源进行考证,欢迎指出任何有错误或不够清晰的表达。可以在下面评论区评论,也可以邮件至 [email protected]

